Somehow we’ve managed to dodge the bullet until now. But when we acquired a tablet, my kids discovered Angry Birds, and now they can often be found with their heads stuck in a small (that’s my phone) or medium (that’s the tablet) screen, playing until I’ve had enough-and-go-do-something-constructive-now-please.
We’ve got all the free and paid versions, and my son fell in love with the Ice Angry Bird in Angry Birds Space. So, being the drive for much of my craftiness, he asked for me to make him one. And, of course, I agreed.
Wahoooooo! Here we go!
Materials
- A small ball of light blue yarn (MC).
- A small amount of orange yarn for beak (CC).
- A small amount of white and black yarn for eyes and eyebrows.
- Fiberfill stuffing.
- 4-4.5 mm crochet hook.
Notes
- Gauge is not critical for this project, just make sure that your stitches are tight enough that the fill does not show through.
Abbreviations
- ch – chain
- sc – single crochet
- st – stitch
- idec – invisible decrease. Instructions for this can be found here.
- [ … ] – repeat instructions in [ ] as many times as specified.
Instructions
Square Body Pieces (make 6)
Foundation: With MC, ch 14. Starting from second ch from hook, sc across (12).
Row 2-13: ch 1, turn, sc 12.
If at this point you do not have a square – undo rows or make more rows until you have a square. The exact row count doesn’t matter, as long as you end up with 6 squares of the same size.
Bind off.
Large Tail Feather
1: With MC, ch 2. 8 sc in second st from the hook, or use the magic loop method.
2-5: sc in each sc around (8)
6: idec, sc in each sc around (7)
7: sc in each sc around (7)
8: idec, sc in each sc around (6)
9-10: sc in each sc around (6)
Bind off leaving long tail for attaching to body.
Smaller Tail Feather & Larger Head Feather (make 2 total)
1: With MC, ch 2. 6 sc in second st from the hook, or use the magic loop method.
2-4: sc in each sc around (6)
5: idec, sc in each sc around (5)
6-7: sc in each sc around (5)
Bind off leaving long tail for attaching to body.
Smaller Head Feather
1: With MC, ch 2. 5 sc in second st from the hook, or use the magic loop method.
2-3: sc in each sc around (5)
4: idec, sc in each sc around (4)
5: sc in each sc around (4)
Bind off leaving long tail for attaching to body.

I had a bit of trouble picking a color for the beak – the orange I had was too dark, the yellow – too bright. I ended up going with the orange. Not perfect, but definitely good enough.
Beak (Bottom)
1: With MC, ch 2. 4 sc in second st from the hook, or use the magic loop method.
2-5: sc around (4)
Bind off leaving long tail for attaching to body.
Beak (Top)
1: With MC, ch 2. 6 sc in second st from the hook, or use the magic loop method.
2-7: sc around (6)
Bind off leaving long tail for attaching to body.
Eyes (make 2)
1: With white yarn, ch 2. 6 sc in second st from the hook, or use the magic loop method
2: Work 2 sc in each sc around (12)
Bind off leaving long tail for attaching to body.Using black yarn, embroider pupils on to the center of the eye.
Eyebrows (make 2)
Ch 7. sc in 2nd st from hook and all the way to the end.
Bind off leaving long tail for attaching to body.
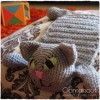
Assemble
Using picture as a guide:
Take eyes, eyebrows and both beak pieces and attach them to one square body piece.
Take one large tail feather and one small tail feather and attach them to the center of another square.
Take one large head feather and one small head feather and attach them to the center of a third square.
Place face square and head square (the one with the head feathers on it) together, wrong sides facing, and sc across top edge with MC. You could also use a blunt needle to sew them together, but I thought that the sc gave it a sharper edge.

Continue attaching the pieces together in the following order:
Bottom and two side pieces to face piece.
Bottom, top and two side pieces to back piece (the one with the tail feathers on it).
Close the gaps between the top and side pieces, and one of the bottom to side pieces.
Stuff the bird with fiberfill.
Close the last gap.
Enjoy!

[This tutorial is free for commercial use. Please read the Terms & Conditions for further details.]