
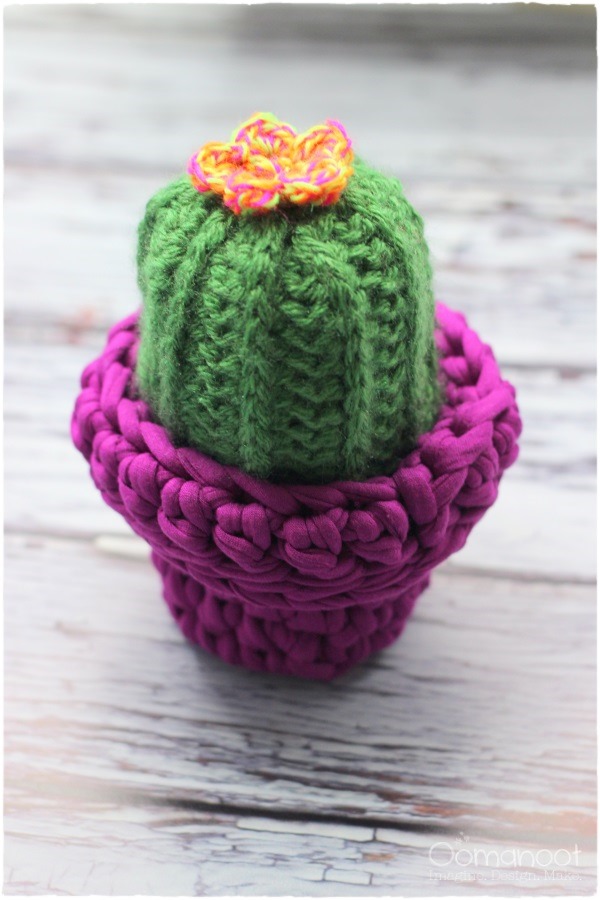
I am entirely obsessed with camel stitch. Just, like, totally doing everything with camel stitch. It’s got that faux-knit-rib thing going for it, and it’s soft and stretchy and oh so fun and easy to crochet. I am making a nice camel stitch TV blanket to cuddle in on cold nights, but that will take a while so I must-must-must share this cute camel stitch cactus.
These make excellent last minute gifts, since they only take about an hour to make, and they are right on trend lately. If you skip crocheting the pot and buy a cute planter at the dollar store (or IKEA) they will take even less time and won’t be any less appreciated, I’m sure.
First things first, we must learn to how to camel stitch. It’s really quite easy.
How to: Camel Stitch
Basically, you start with a row of hdc (half double crochet). Chain 2, turn. Now, normally you would continue crocheting into the top of the stitch which is made of two loops (front and back loops). However, facing you there is a third loop which you’ve probably never noticed before, created by the hdc, just below the front loop (see picture). That’s where we’re going to insert our hook. This causes the top of the hdc to be pushed forward, and that’s what gives us the faux-knit-rib I mentioned before.
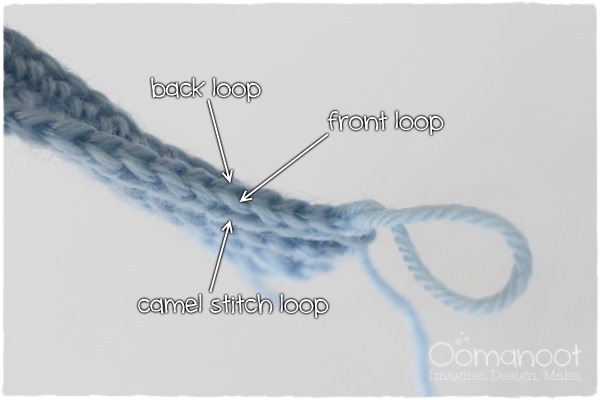
Here’s another view of those loops I was talking about before, after a few rows have been completed.
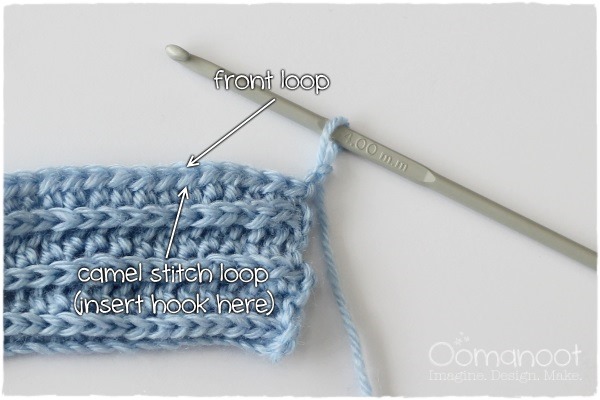
So, just yarn over, insert hook into the camel stitch loop, yarn over and pull through that first loop. Then, yarn over again and pull through all 3 loops to complete your hdc.
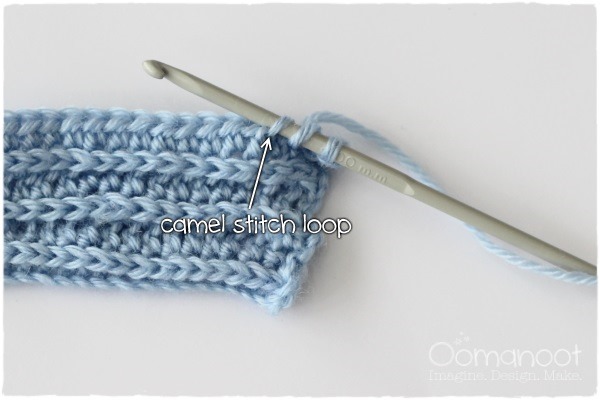
Got it? Great! Now, let’s make a cactus.
Materials
- 4mm hook
- a small amount of green worsted weight yarn (less than 25 gr) (MC)
- an even smaller amount of worsted weight yarn for the flower, color of your choice (CC)
- fiberfill stuffing
- a blunt needle for weaving in loose ends
- If you’re crocheting the flower pot as well, you will also need a small amount of T-shirt (or other bulky weight) yarn and a 9mm hook.
Notes
- Gauge is not critical for this project, use thicker yarn to get a larger result or lighter yarn for a smaller result.
- Use a smaller hook than recommended for the yarn you are using, the camel stitch is quite loose and we don’t want the stuffing to show.
- Written instructions here are for the tall and thin cactus, but you can easily change the number of stitches and rows to change the shape of the cactus, you can go for tall and thin or short and squat, according to your preference.
Abbreviations
- ch – chain
- sc – single crochet
- hdc– half double crochet
- dc – double crochet
- sl st – slip stitch
- st – stitch
- ch2 sp – space created by ch2 in previous round.
- blo – crochet in back loops only.
- [ … ] – repeat instructions in [ ] as many times as specified.
Instructions
Cactus Body
1: With MC, ch 22. hdc in 3rd st from the hook. Continue hdc until the end of the chain (20 stitched at the end of this row).
2: Work a camel stitch in the back of each hdc across. hdc in the top of the starting chain. ch 2, turn.
3-16: Repeat row 2.
Bind off leaving a long tail. Sew the last row and the first row together to create a tube. Then, pass the yarn through sides of the crochet rows, at the adjacent open end of the tube and pull tightly to gather the top of the cactus. Sew shut and Bind off. Turn inside out.
Stuff the cactus, and close off the bottom using a needle and yarn like you did for the top end. This part will be inside the flower pot, so its neatness is less of an issue.
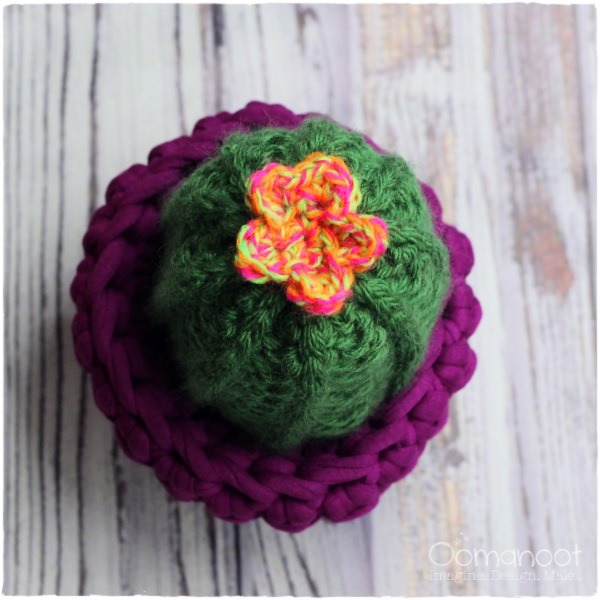
Flower
1: With CC, ch 2. 6 sc in 2nd st from hook, or use the magic loop method. Join in the top of the first st.
2: [ch 2, sl st in next st] 5 times.
3: [in next ch2 sp: sl st, hdc, dc, hdc, sl st] 5 times to create the flower petals.
Bind off leaving a long tail. Sew flower onto the top of the cactus.
Flower Pot
1: With bulky yarn and 9mm hook, ch 2. 6 sc in 2nd st from hook, or use the magic loop method. Join in the top of the first st, ch 1 (do not turn).
2: [work 2 sc in next st] 6 times. Join, ch 1 (12 sc at the end of this round).
3: sc in blo around. Join, ch 1 (12).
4: [work 2 sc in next st, sc in next 5 st] 2 times. Join, ch 1 (14).
5: [work 2 sc in next st, sc in next 6 st] 2 times. Join, ch 1 (16).
6: [work 2 sc in next st, sc in next 7 st] 2 times. Join, ch 3 (18).
7: dc in blo around. Join, ch3 (18).
8: dc in flo around. Join (18).
Fold the last round of dc down to create a brim. slip stitch around through the back loop of the dc and the front loop left by crocheting in blo in round 7. Join, bind off.
Enjoy!
[This tutorial is free for commercial use. Please read the Terms & Conditions for further details.]




[…] Welcome to the crocheting world with this fun and easy crochet camel stitch cactus pattern! This free pattern is perfect for those looking for a cool, soft, stretchy project that won’t last only about an hour. It’s excellent as a last-minute gift, and it looks great too! You’ll love working up this cute camel stitch cactus and impressing your friends with the results. Make one today with this crochet cactus pattern! oomanoot […]
[…] 10, 2016 In: Crochet 32 Comments Look! more camel stitch! I just love the faux knit rib effect, it works so beautifully on a large scale piece such as this. […]
Beautiful easiest way to make cactus in pot, thank you.
can you please tell the number of repeats for this pattern to create the desired size? thank you.
Your third photo description says “insert hook into the camel stitch loop, yarn over and pull through that first loop. Then, yarn over again and pull through all 3 loops to complete your hdc.”.
Where did the third loop come from? If you have the original loop, then pull through a yarn over that’s only 2 loops. Then it says to yarn over and pull through all 3 loops. What third loop?
The instructions say “so yarn over then insert hook…. You need the first yarn over to make the three loops
[…] instructions for camel stitch can be found here. […]
Fabulous cactus and the pot …of course the flower… I am still matching colours and other material at hand… I do this for “Sister Works”
I will update you further when the project get going. Thanks…
This Camel stitch throw is just what I have been looking for. But the best thing is finding a website that not only shows you the blanket, the pattern and gives clear instructions. To get all three is a real find. I find blankets all the time but you have to go through four or five sign ups, then the directions are hard to follow or not available. So thank you for the whole picture!
[…] more camel stitch! I just love the faux knit rib effect, it works so beautifully on a large scale piece such as […]
[…] cactus I HDC in the camel stitch, which is the loop under your typical V stitches. It gave a more defined ridge so it’s worth […]
[…] Get the Tutorial […]
Looks amazing Rina! Really want to crochet some cactuses too, but so busy with so many other projects at the moment. Hope you’ll share this on craft schooling sunday when it returns in January!
Sure! I’d love to 🙂
Wow I LOVE this!! Definitely going to give it a go and I can’t believe that is crochet, I assumed it was knitted when I looked at the photo!
I know! That’s why I love it so much. I’m planning to post a couple more camel stitch projects soon, so make sure to come back for more ideas 🙂