

It’s November, almost December really. But it’s not cold. Global warming anyone? Nah, just one of those years when winter is really late. But I am ignoring the weather, because it’s that time of year: the time for making winter hats.
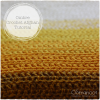
This hat can be made in as many colors as you want, I made one in a solid color with a bulky yarn and one in two colors in worsted weight yarn, but you could go zebra with black & white or full circus tent with as many colors as you like. I’ve included instructions for worsted weight to fit an adult, but the pattern can be easily adjusted to fit any size head.
Materials
- 4.5mm hook
- 2 balls of worsted weight yarn in 2 colors (MC, CC)
- blunt needle for weaving in loose ends
Notes
- Worsted weight option gauge: 5 rows X 8 stitches in Camel Stitch make a 2” square.
- Bulky yarn option gauge: 3 rows X 5 stitches in Camel Stitch make a 2” square.
Abbreviations
- instructions for camel stitch can be found here.
- ch – chain
- st – stitch
- sl st – slip stitch.
- hdc – half double crochet
- blo – back loops only
- [ … ] – repeat instructions in [ ] as many times as specified.
Instructions
1: With MC, ch 32. hdc in 3rd st from the hook. Continue hdc until the end of the chain (30 stitches at the end of this row).
2: Work a camel stitch in the back of each hdc across. hdc in the top of the starting chain. Change color to CC, ch 2, turn.
3-4: Repeat row 2 with CC. Change colors to MC, ch 2, turn.
5-52: Repeat row 2, alternating CC with MC every two rows.
Bind off leaving a long tail. Sew the last row and the first row together to create a tube. Then, pass the yarn through sides of the crochet rows at the adjacent open end of the tube and pull tightly to gather the top of the hat. Sew shut and Bind off. Turn inside out.
To get a clean edge if you are alternating colors, I decided to use a technique similar to the perfect color change. If you’re using a single color you can skip row 1, and instead of crocheting in blo in row 2- hdc evenly around the edge of the hat.
1: With MC, sl st around the bottom edge of the hat.
2: hdc in BLO around. Join, ch 2.
3: hdc in BLO around. Join. Bind off.
Weave in loose ends.
Optional: Add a pom-pom to the top of the hat because it’s cute.

Enjoy!
[This tutorial is free for commercial use. Please read the Terms & Conditions for further details.]


[…] Camel Stitch Hat […]
Thankyou for this new to me pattern I love it.