– Part 2: Tag Blanket Tutorial")
When my sister was born I noticed that babies spend much more time playing with the tags on toys than with the actual toys. Even at that young age (this was 1998, and I was 16 at the time) I thought that there should be toys made entirely from tags! What a stroke of genius! Well, apparently it was a good idea, because somebody else thought of it, and tag blankets are now sold everywhere. I even got one from my mother when my own daughter was born.
But! I will not let such a small thing hinder my creative efforts! And when the chance came, I realized that tag blankets are a quick and easy baby gift, and – being handmade – much appreciated. I made a few from scrap fabric I had lying around before realizing I had lovely scraps left over from the soft baby blocks I shared with you last post, and that this would be a perfect use for them.
So, here we go.
Materials & Notions
- Front: If you’re using scraps left over from a charm pack – 25 strips of fabric. Otherwise, you’ll need about 8-10 fabric scraps of various sizes.
- Back: A small amount of minky, or 4 left over squares from a charm pack.
- Tags: 9 strips of left over scraps or ribbons.
- Matching thread
- Standard sewing supplies (scissors, seam ripper, etc.)
Instructions
-
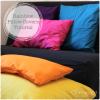
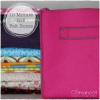
Lay out fabric pieces: Lay out your fabric pieces and arrange them to your liking. If you’re using the left overs from a charm pack you can use my layout as a guide, or take a look at a more random arrangement in the other tag blankets shown at the end of this post. Take into account that you will be losing a lot of width due to seam allowances so overlap the pieces a bit to get a feel of what the actual size will be when you’re done.When you’re happy with your arrangement, label the pieces or take a photo. You will forget how it was.
 – Part 2: Tag Blanket Tutorial")
This is me playing around with the layout. Pretty, huh?
 – Part 2: Tag Blanket Tutorial")
 – Part 2: Tag Blanket Tutorial")
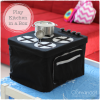
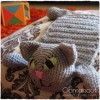
Meanwhile, this was going on behind my back and I had to take a break to help with some Lego problem. But – all’s well that ends well – all the pieces were found and the car was assembled perfectly. Crisis averted, and back to the sewing table.
 – Part 2: Tag Blanket Tutorial")
-
Assemble front: We will assemble the columns first, and then sew the columns together. Take the pieces from the first column. Place two adjacent pieces together right sides facing along the short edge and sew together with a 1/2 cm (1/4”) seam allowance. Press seam open. Place the next adjacent piece and repeat until you are done with the column.
Repeat for other columns.
Place two adjacent columns together right sides facing, sew together along the long edge with a 1/2 cm (1/4”) seam allowance. Press seam open. Place the next adjacent piece and repeat until you are done with all the columns.
-
Assemble backing: I used 4 squares sewn together for the charm pack tag blanket (same method as assembling front – two squares for each column, then sew both columns together), and a minky backing for the other two.
Place front on top of the backing and trim both together in the shape of a square.
-
Create tags: If you’re using ribbons, select 9 ribbons of various colors and textures and cut 12 cm (5”) long pieces from each and fold them in half.
If you’re making your own tags from scrap fabric, take 9 strips of fabric 12 cm (5”) long by 4 cm (1.5”) wide. Fold in half right sides facing. Sew along both long edges. Trim corners and turn right side out out.
 – Part 2: Tag Blanket Tutorial")
I don’t know what I was thinking when I sewed these around the folded edge. Silly me.
-
Assemble Tag Blanket: Arrange 3 ribbons/tags on one edge on top of the front piece. Place tag raw edges a bit beyond the edge (the tags should be facing in, towards the center of the piece) to make sure that it secured well. We don’t want them unraveling or getting pulled out by teething infants…
Pin in place. Repeat for the other three sides.
 – Part 2: Tag Blanket Tutorial")
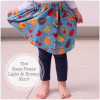
For the scrappy-pink version I decided to make one longer strap and make a handle. The real reason was that I didn’t have enough ribbons to match the colors I used, but it ended up being quite useful for tying to a stroller and preventing small hands from dropping it when mom is looking the other way.
Place back on top of front, right sides facing. Pin in place. The tags should be between both layers, with their edges “peeking” out slightly.
Sew around all 4 edges, leaving a 10 cm (4”) gap for turning right side out.
Turn right side out and edge stitch around all 4 edges, closing the gap as you go.
 – Part 2: Tag Blanket Tutorial")
Enjoy!
Don’t forget to share your thoughts and/or finished projects – here, on facebook or twitter! I’d love to see the color combinations and layouts you come up with!
 – Part 2: Tag Blanket Tutorial")
 – Part 2: Tag Blanket Tutorial")
[This tutorial is free for commercial use. Please read the Terms & Conditions for further details.]