

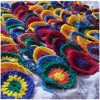
Suddenly, spring has sprung all around us. Butterflies and ladybugs and an occasional mosquito(yes! already!) and beautiful flowers are everywhere. Last week we took a walk and I was taking photos of everything and I just felt so inspired to create… I got home and started crocheting pretty much immedietly. My daughter took one look at the result and said: “Hey! that’s the flower and ladybug we saw at the park!”. And she was exactly right, as you can see.

This is a quick and easy project, just right for spring! It can be used on a hair clip or as an applique or I dunno, just to look at and be happy. So let’s get started…
Materials
- A small amount of worsted weight yellow yarn, and even less red & black worsted weight yarn
- 4mm hook
- blunt needle for weaving in loose ends
Notes
- Gauge is not critical for this project, use thicker yarn to get a larger result or lighter yarn for a smaller result.
- Pattern is worked in continuous rounds. Do not turn or join unless specifically instructed.
- Place a marker in the last stitch of every round. Move it up as you work.
Abbreviations
- ch – chain
- sc – single crochet
- st – stitch
- sl st – slip stitch.
- blo – back loops only
- [ … ] – repeat instructions in [ ] as many times as specified.
Instructions
Flower
1: With yellow yarn, ch 2. 6 sc in second st from the hook, or use the magic loop method.
2: Work 2 sc in each st around – 12 sc at the end of this round (12)
3: [2 sc in next st, sc in next st] 6 times (18)
4: [ch 6, sl st in blo in next st] 18 times. Bind off.
Ladybug
Body: With red yarn, ch 2. 8 sc in second st from the hook, or use the magic loop method. Join in top of first st.
Head: Join black yarn in one of the st from the previous row. ch 1, sl st in next st, bind off leaving a long tail.
Dots: Using a blunt needle and long tail, embroider black dots on the ladybug’s body. Sew ladybug onto flower and weave in loose ends.
And just before we’re done, take a few more seconds to be inspired by spring…
Enjoy!


[This tutorial is free for commercial use. Please read the Terms & Conditions for further details.]


[…] the free pattern here. While you’re visiting Rina’s blog, you can also scroll down on this page to see […]
Thank You for the free pattern on mini ladybugs!!!!
how clever are you, I adore that little ladybird you created, got to try this, thank you for the share
Thanks! Enjoy 🙂
[…] Tutorial at Oomanoot Blog […]
[…] Crochet Flower andamp; Ladybug Time to get inspired by spring and crochet a flower & ladybugTo Learn “Crochet Flower andamp; Ladybug” DIY & Crafts click here […]
Cute! This will be the perfect little extra for my springtime wreath.
Ooooh, that sounds fun! I’d love to see it when it’s ready 🙂