

I am way to pleased with myself for naming the pattern Buckinghamigurumi (try saying that 10 times fast). Aaaaaaaand, I’m over it. Let’s get on with the post.
My friend Racheli is celebrating 10 years of blogging (10 years! wow!), and in honor of this occasion, she asked 10 bloggers to write a post inspired by her (or her blog).

I met Racheli online, I’m sure it was through facebook somehow, but my memory is terrible, I’m not exactly sure of the details. She was nice enough to invite me to a celebration of the Queen’s Diamond Jubilee. Although we live in Israel, Racheli loves everything and anything British, and the party was incredible. If you follow this link, you’ll see the amazing decorations and excellent food (the text is in Hebrew, but the pictures speak for themselves).
When she asked me to contribute to her “10 years of blogging, 10 days of inspiration” project, I started in another direction (I was thinking a Hagrid costume, because of the geeky aspect of her blog), but when this idea hit me – I just knew it was the right thing!
By the way, all the pictures of London in this post were taken in 2004, before I even had a digital camera. The quality is so-so, but I figured since I have the pictures it would be a crime not to use them. Right?
So, let’s get started.
Materials
- A small amount of red, black, white and body color of your choice worsted weight yarn
- 4 mm crochet hook
- A small amount of fiberfill stuffing
- Safety eyes (optional)
- Blunt needle
Notes
- Gauge is not critical for this project, just make sure that your stitches are tight enough that the fill does not show through.
- Pattern is worked in continuous rounds. Do not turn or join unless specifically instructed.
- Place a marker in the last stitch of every round. Move it up as you work.
- Every time I change colors, I use the perfect color change, which gives the doll a cleaner finish – without jagged edges where the colors meet.
- The final height of the doll is approximately 23cm/9in (using worsted weight yarn and 4 mm hook).
Abbreviations
- ch – chain
- sc – single crochet
- st – stitch
- sl st – slip stitch
- blo – back loops only
- flo – front loops only
- dec – invisible decrease. Insert hook into front loop of the indicated stitch. Insert hook into front loop of next stitch. Yarn over, pull yarn through both front loops. You will now have two loops on the hook. Yarn over and pull through both loops to complete the invisible decrease (1 stitch decreased).
- yo – yarn over
- bobble – [yo, insert hook in indicated st and pull up a loop, yo and pull through 2 loops] 4 times, yo and pull through all 5 remaining loops on hook.
[ … ] – repeat instructions in [ ] as many times as specified.

Instructions
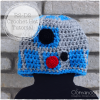
Hat
1: With black yarn, ch 2. 6 sc in second st from the hook, or use the magic loop method.
2: Work 2 sc in each st around – 12 sc at the end of this round (12)
3: [2 sc in next st, sc in next st] 6 times (18)
4-12: sc in each st around (18).
Switch to body color in the last stitch of the 12th round – final yarn over and pull through with the new color.
Head
13: With body color, sl st in blo around (18)
14: sc in blo around (18).
15: sc in each st around (18).
16: sc 7, bobble in next st (this will be the guard’s nose), continue sc around (18 including bobble)
17: sc in each st around (18).
Place eyes between 14th and 15th round, evenly spaced from the nose.
Stuff hat and head firmly.
18: [dec, sc in next st] 6 times (12)
19: [dec, sc in next st] 4 times (8)
Switch to red in the last stitch of the round – final yarn over and pull through with the new color.
Finish stuffing head.
Body
20: With red, sl st in blo around (8)
21: [2 sc blo, sc in next blo] 4 times (12).
22: [2 sc in next st, sc in next st] 6 times (18)
23-29: sc in each st around (18)
Stuff body firmly.
30: sc in flo around (18)
31: sc in each st around (18)
Bind off.
Legs
Turn doll over. Insert hook from the outside in, into the a back loop left over from round 30, in the middle of the back of the doll.
1: With black yarn, sc around (18)
2: sc 8, sc2tog with the first st of the round. (8)
Continue sc around until leg measures approx. 6.5 cm / 2.5 in long. Bind off.
Join black yarn and repeat instructions starting from round 2 to create the second leg.
Stuff legs.

Feet (make 2)
1: With black yarn, ch 2. 4 sc in second st from the hook, or use the magic loop method.
Continue sc around until foot measures approx. 2.5 cm / 1 in long. Bind off.
Arms (make 2)
1: With red yarn, ch 2. 4 sc in second st from the hook, or use the magic loop method.
Continue sc around until arm measures approx. 6.5 cm / 2.5 in long.
Switch to body color in the last stitch of the round – final yarn over and pull through with the new color.
2: sl st in blo around (4)
3: sc in blo around (4)
Bind off and sew hand shut with the yarn tail left from the bind off.
Assemble
Attach feet to legs & arms to body using a blunt needle.
With white yarn, sl st around horizontally (on top of the finished crochet stitches) around the neck and around the waist of the doll (to create the belt and collar). Embroider the button line vertically along the front of the doll.

Thanks to Shiri Kraus for her translation advice on how to make the guards speak British instead of my American.
Enjoy!
P.S.
You’ve got to take a look at Big Ben’s Clock twitter account. I think it’s a stroke of genius (see what I did there?) and absolutely hilarious.

[This pattern is for personal use only. Items made with this pattern may not be sold without my explicit permission. Please read the Terms & Conditions for further details.]


[…] אמיגורומי, ורינה נתנה ללמלאכה שלה את השם המעולה – באקינגהמיגורומי. תנו קפיצה לבלוג של רינה, כדי לקרוא את הפוסט שלה עם כל […]